Adobe Photoshop is an incredibly versatile program. Whether it’s textures, gradients, or paint brushes, there seems to be no end to the ways that you can adapt this program to suit your needs.
However, when it comes to coloring your images, what if you don’t like Adobe Photoshop’s default color swatches? With that in mind, here’s how to create a custom color palette in Photoshop.
Step 1: Find Your Color Inspiration

The first thing you’ll want to do is open an image where you can draw “color inspiration” from.
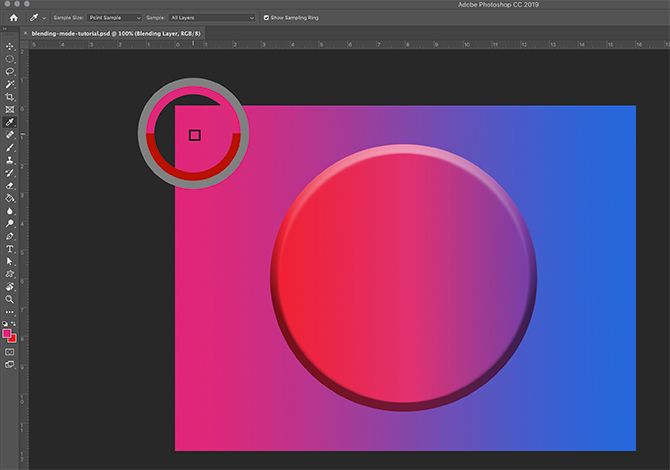
For this tutorial I’m going to use the file we created for another tutorial explaining how to use the blending mode in Photoshop.
After you open up your file, you’ll see a screen setup similar to the one I have now. Your image will be in the center of your workspace, and your default color palette will be along the right side.
Step 2: Learn About Your Color Swatches Panel

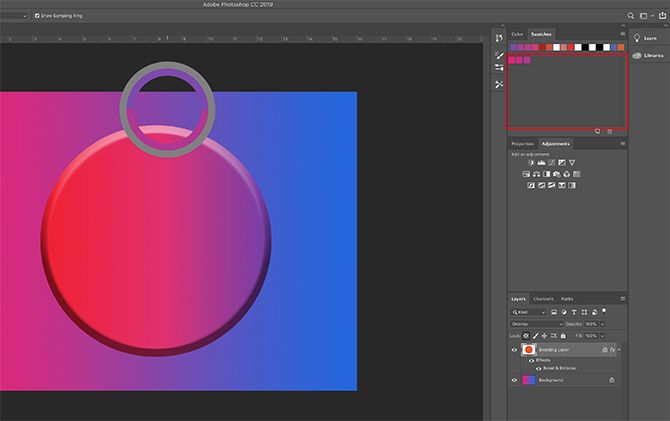
The place where we’ll be focusing our efforts is the Color Swatches Panel, located in the top right-hand corner of your workspace.
This is what your default color swatches will look like, so long as you leave them unaltered—a group of squares laid out in a grid.
Along the top row you’ll see a series of seemingly random colors. These are colors I’ve sampled recently with my Eyedropper tool in my own version of Photoshop. Photoshop puts them there so I can quickly pull them up again if I need to.
Beneath these samples is a rectangular grid. This grid contains Photoshop’s default color palette.
This grid is fine by itself, but as mentioned we’re creating a custom color palette, so we won’t need it. Let’s get rid of these swatches.
Step 3: Delete the Old Color Swatches

To delete these color swatches, click on the dropdown menu icon in the top right-hand corner of your Swatches panel. We’ve highlighted it in red for this tutorial.

Next, a giant menu will emerge. This menu will give you a list of all the actions you can take with your Swatches panel.
It will also give you a list of default colors available to you in Photoshop. Click on Preset Manager.

Once you click on Preset Manager, a new pop-up box will emerge. In this box you can control the color swatches currently active in your Swatches panel.
You can also:
- Load more colors to make the color palette larger.
- Delete colors.
- Rearrange the color grid.
- Rename the colors you already have.
- Create a brand new set of colors.

To delete these default colors, left click on the first color.
Then left click + shift on the last color, to highlight the entire palette. You’ll know it’s highlighted by the blue outlines around the squares.
Next, click Delete, then click Done.
Don’t worry that this will permanently change your default color palette. Photoshop already has the template saved so you can call it up later.
Step 4: Use the Eyedropper Tool

Now that you’ve gotten rid of your default colors, you’re ready to create new ones.
To select individual colors for your custom color palette, activate your Eyedropper tool, found in the left-hand toolbar.

Next—in the top left-hand corner where you see a dropdown menu that says Sample—click and choose All Layers.
This All Layers option means that you’re sampling all layers in a file as they appear in a “finished” image—not how the colors look when they are on separate layers.
This will make the process of picking your colors much quicker.
Step 5: Create a New Color Swatch

After you have your Eyedropper tool and All Layers selected, click on your page where you want to sample a new color.
You’ll see a color wheel pop up around the color you’re sampling. On the top of the wheel you’ll see the color you’re currently sampling—in my case, bright pink. Along the bottom will be the color you previously sampled with your Eyedropper tool. For me, that color was red.

Once you have your color, move your Eyedropper tool over the empty Swatches panel. You’ll notice that the cursor switches from an Eyedropper icon to a Paint Bucket.
Once the icon switches, left click on the empty Swatches panel. Photoshop will immediately drop your new color into the window pane.

After you drop the swatch, a window called Color Swatch Name will emerge. This is where you will name your new swatch and have the option to save it to your library. Once you name it, click OK.

If you clicked the option to save this color to your library, you may see the Libraries panel open up and extend over the Swatches panel—especially if this is the first time you’ve completed this step.
We’re not going to explore Libraries in this tutorial. To get rid of it, simply click on the button that says Libraries. It will collapse the panel and you can keep working on your Swatches.
Step 6: Finish Creating Your Color Swatches

After you finish Step 5, repeat that step again and again until you have as many colors as you need for your custom color palette.
Each time you add a new color, it will show up in your Swatches panel.

Once you have all the colors you need, click on the Swatches dropdown menu, then click Preset Manager.
As we did when we first opened Preset Manager, you’ll see the options to Load, Save Set, Rename, and Delete.
Instead of deleting colors, however, we’re going to rearrange them based on hue.
To rearrange your swatches, click on a color so it’s highlighted. Then click and drag the color to where you want it to show up. You’ll know where you’ve dragged this color by the blue line that shows up as you pull it across the swatches.
Arranging the colors like this allows you to see if you’ve sampled the same color twice.

In this case, I did sample the same color twice. To delete that extra color swatch, click on it so it’s highlighted blue. Then click Delete.
After your color palette is arranged to your satisfaction, click Done. Photoshop will exit the Preset Manager.
Step 7: Save Your Color Palette

Once you’re out of the Preset Manager, you can check to see how your colors look in the Swatches panel.
If you’re happy with what you have, it’s time to save.

To save these swatches as a custom color palette, click on the Swatches dropdown menu, then click Save Swatches.
The Save As dialogue box will pop up, and you can name your color palette from there. Give it a meaningful name that is easy to remember.
Step 8: Reset Your Swatches Back to Default

Let’s say you don’t want to use this custom color palette anymore, and you want to go back to default.
To do this, click on your Swatches dropdown menu. Then click Reset Swatches.

When Photoshop prompts you to replace your current colors, click OK.
It’s important that you do not click Append here. If you do, it will simply add the default colors to your custom color palette instead of replacing them.
Step 9: Reload Your Custom Color Swatches

Now that you have your default color palette active, how do you find your custom swatches again? How do you switch back?
Again, the process is simple.
Just go to the Swatches panel, click on the Swatches dropdown menu, then click Replace Swatches.

Inside your Color Swatches folder, you’ll find the file for the color palette that you want to use. Select the file you need, click Open, and it will load.
And that’s it! You’re done.
Other Ways to Customize Photoshop
Now that you’ve learned how to create a custom color palette in Photoshop, you can put this skill to good use when you’re designing your next image.
Are you looking for other ways to customize the program? Then check out our tutorial detailing how to create custom brushes with Photoshop.
Read the full article: How to Create a Custom Color Palette in Adobe Photoshop


