
Jetpack is one of the most popular WordPress plugins. It’s made by Automattic (the same company that’s responsible for WordPress itself), and ports many of WordPress.com’s best features over to the self-hosted WordPress sites.
Remember, to use self-hosted WordPress, you’ll need a web hosting provider. We recommend InMotion Hosting (get up to 50% off using this link), which offers six dedicated WordPress plans that’ll suit sites of all sizes.
Keep reading, and we’ll explain how to install and set up Jetpack on your WordPress site.
What Is Jetpack?
In case you’re new to Jetpack, let’s take a moment to list the plugin’s main features. If you already know what it’s capable of, feel free to skip ahead.
Jetpack’s key features are:
- Site statistics
- XML sitemaps
- Automatic sharing to social networks
- Social sharing buttons on your articles
- Security enhancements
- Image CDN
Best of all, Jetpack lets you enable and disable its many features at your discretion. It prevents your site from becoming bloated with unused tools.
How to Install Jetpack on Your WordPress Site
It goes without saying that before you can install Jetpack, you first need to install WordPress. The process for installing WordPress differs between hosting providers. Some use third-party installers like Softaculous; others have simple one-click installers that require minimal user input.
Once you have installed WordPress, log into your site’s dashboard with an admin account. Typically, you can log in at www.[sitename].com/wp-login.php.
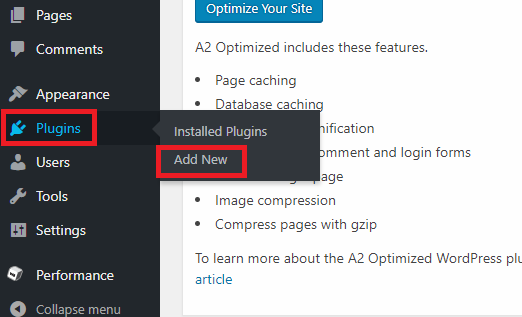
After you have successfully logged in, navigate to Plugins > Add New in the panel on the left-hand side of the screen.
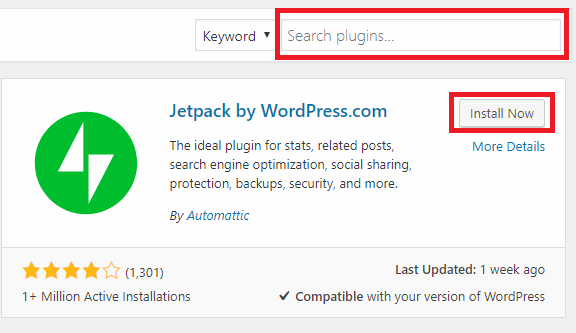
Because it is such a popular plugin, you should see Jetpack listed at the top of the page. If you don’t, use the search box in the upper right-hand corner to locate it.
When you eventually find Jetpack’s listing, click on the Install Now button to add it to WordPress. The installation process will take 15-30 seconds to complete.
But wait, you’ve not finished yet—you need to activate the plugin. If you’re still looking at Jetpack’s listing, the Install Now button should have changed to Activate.
If you have already navigated away, go to Plugins > Installed Plugins, find Jetpack on the list, and click on Activate. Again, the process will take a few seconds to complete.
How to Set Up Jetpack on Your WordPress Site
Assuming the activation process was successful, you should be looking at a page which introduces you to all Jetpack’s features.
You can ignore it; head straight to the new Jetpack link at the top of the left-hand panel. Look into these six core areas:
1. Connect Jetpack to WordPress.com
You cannot access any of Jetpack’s features until you connect it to a WordPress.com account.
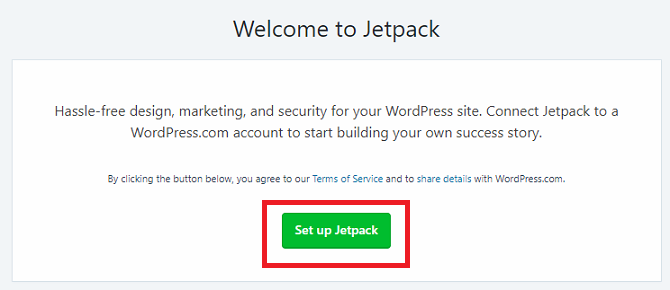
Click on Set up Jetpack, and you will be automatically redirected to WordPress.com. You can either sign in with an existing account or make a new one. Either way, agree to the connection using the on-screen prompts.
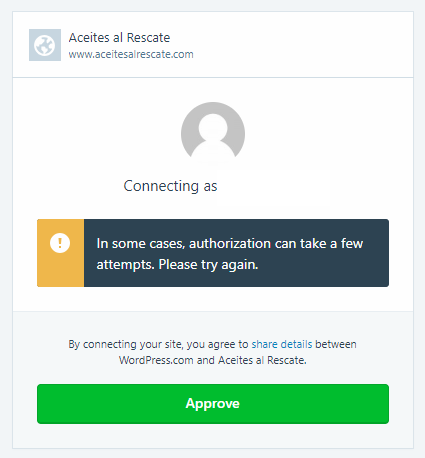
Unfortunately, Jetpack frequently fails to connect to WordPress on the first attempt. It’s been a problem for years. There’s nothing you can do; keep trying until it works.
Finally, you’ll need to choose your payment plan. Scroll down and click on Start with free.
2. Jetpack’s Writing Settings
After you’ve connected Jetpack to WordPress.com, it’s time to start customizing the plugin. Head to Jetpack > Settings to begin.
There are five tabs along the top of the page: Writing, Sharing, Discussion, Traffic, and Security.
The Writing tab contains the options pertaining to creating content. There are a few that are worth paying particular attention to:
- Global CDN: Jetpack offers a CDN (content delivery network) for images. It makes pages load faster for your visitors. However, some hosting providers offer free access to Cloudflare’s CDN. Generally, it’s not advisable to use two CDNs, so make sure you do your research before enabling this option.
- Lazy Loading: If you have an image-heavy site with lots of posts on your front page, you might find your site loads slowly. To remedy the problem, enable Lazy Loading. It will only load images as your visitor scrolls down the page. The option is especially effective at speeding up the mobile version of your site.
The Writing tab also lets you turn on the spellchecker, create new posts by email, and write content in plain-text Markdown.
3. Jetpack’s Sharing Settings
The Sharing menu only offers three settings. There’s an option that lets you automatically share your content on social networks, an On/Off toggle that adds sharing buttons to your posts, and a setting that adds a (non-Facebook) “Like” button to each article.
If you want to enable automatic social sharing, slide the toggle into the On position and click Connect your social media accounts. You will be redirected to WordPress.com to make the connections.
4. Jetpack’s Discussion Settings

The Discussion tab lets you determine how people interact with your site.
The most noteworthy setting is the first one—it allows your readers to use their WordPress.com, Twitter, Facebook, and Google+ accounts to comment on your articles. Turning this setting on will make your comments feed look richer; a person’s name and a picture will be shown alongside the comments.
Further down, you can also choose to add a subscribe button to your site. Visitors can fill in their email address and receive alerts when new content goes live.
5. Jetpack’s Traffic Settings
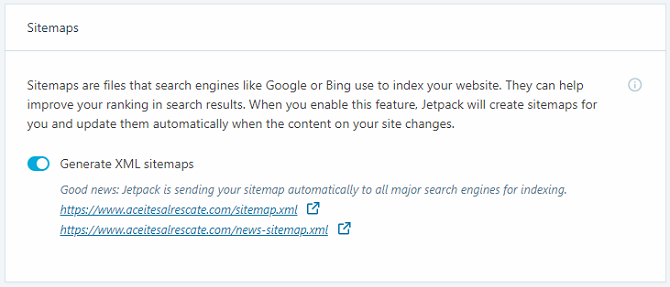
The Traffic tab is where you will find your XML sitemaps and site verification codes.
The sitemaps improve your site’s SEO by telling search engines how your site is laid out. The verification codes allow you to add your site to Google’s, Yahoo’s, and Yandex’s webmaster consoles.
If you use another plugin (such as Yoast) to generate sitemaps and verification codes, you can disable the setting in Jetpack. Generating two sitemaps can cause conflicts. For example, Yoast’s Google News sitemap plugin doesn’t use the same XML address as Jetpack.
6. Jetpack’s Security Settings
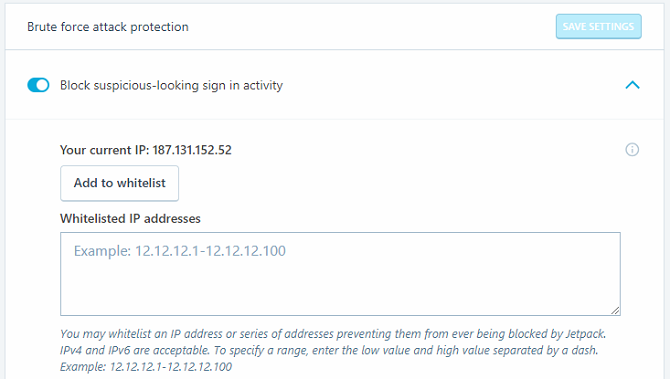
Jetpack offers brute force protection and a way to monitor your site’s downtime. You can configure both features in the security tab.
The downtime feature will send you an alert the moment your page goes offline, allowing you to quickly remedy the issue before it escalates further.
The brute force protection is a simple On/Off toggle. If it’s malfunctioning, you can manually whitelist IP addresses using the drop-down menu.
Note: With all the Jetpack settings discussed above, be aware that your both your theme and other plugins could override them.
Does Jetpack Slow Down Your Site?
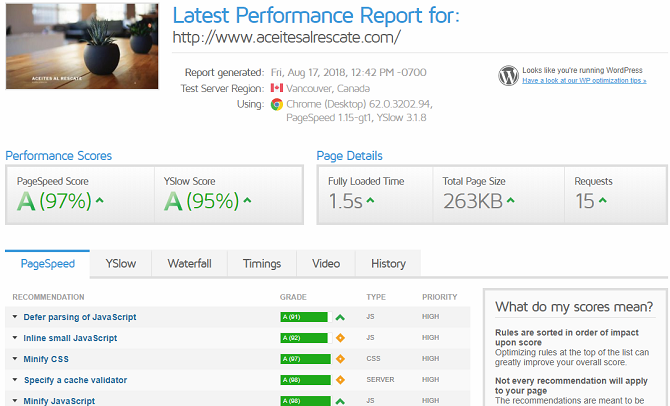
Some reports have claimed Jetpack adversely affects the speed of your site. Webidextrous says the plugin’s external server requests add up to 1.5 seconds to the page loading time. Anecdotal evidence from some users suggests it might be as high as five seconds.
To check whether your page loading time has been affected, use a third-party tool like GTMetrix or Google’s PageSpeed Insights.
And remember, an important part of making sure WordPress runs smoothly is making sure you sign up for a hosting plan that meets your needs. InMotion Hosting (get up to 50% off using this link) offers plans for WordPress users starting at $ 4.99/mo.
Choosing the right web host and selecting the right plugins are essential steps for every WordPress beginner. If you are planning to start a blog anytime soon, they can make the next steps a lot smoother.
Read the full article: How to Install and Set Up Jetpack on Your WordPress Site


