An encrypted USB flash drive is the safest way to carry sensitive files.
Unfortunately, you cannot password protect your entire USB flash drive, like you can password protect your PC or phone. Secure tools all work with encryption. Unless you want to invest in an encrypted flash drive with hardware encryption, you can use freeware applications to achieve a similar level of USB protection.
This article summarizes the easiest ways to password protect or encrypt files and folders on a USB flash drive.
1. Rohos Mini Drive: Create an Encrypted Partition
Many tools can encrypt and password protect your data. Most, however, require Administrator rights to run on any given computer. Rohos Mini Drive, however, works whether or not you possess Administrator rights on the target computer.
The free edition can create a hidden, encrypted, and password-protected partition of up to 8 GB on your USB flash drive. The tool uses automatic on-the-fly encryption with AES 256-bit key length. Thanks to the portable Rohos Disk Browser, which you install directly to your flash drive, you won’t need encryption drivers on the local system. Subsequently, you can access the protected data anywhere.
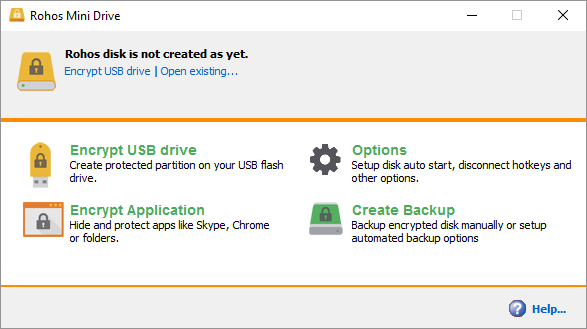
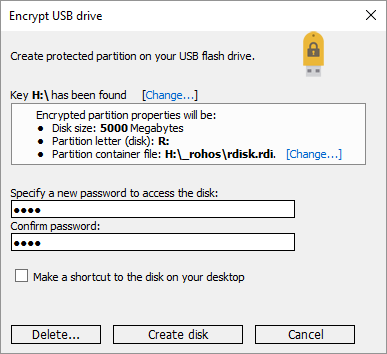
Click Encrypt USB drive from the Rohos Mini Drive start screen, select the drive, specify a new password, and click Create disk. This will create a password-protected and encrypted container on your external drive.
You can open the protected container by clicking the Rohos Mini.exe icon from the root folder of your USB thumb drive. After entering the password, the Rohos disk will mount as a separate drive and you can access it via File Explorer. To close your Rohos partition, right-click the Rohos icon in the Windows Taskbar notification area and select Disconnect.
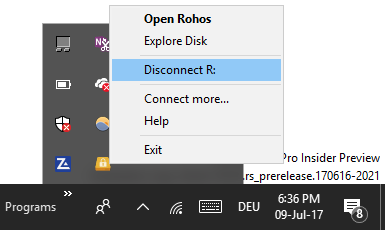
Download: Rohos Mini Drive
2. VeraCrypt: Encrypt Your Entire Flash Drive
VeraCrypt is the successor of TrueCrypt. It comes as a portable app that runs directly from your flash drive. VeryCrypt does require Administrator rights to operate. It uses on-the-fly AES 256-bit encryption. The free version is limited to drive sizes of 2 GB.
VeraCrypt features on-the-fly encryption using multiple different encryption algorithms, including 256-bit AES, Serpent, and TwoFish, as well as combinations of these. Like Rohos Mini Drive, it can create a virtual encrypted disk that mounts like a real disk, but you can also encrypt entire partitions or storage devices.
Download VeryCrypt Portable and install it on your USB drive. When you launch the portable app, it will show you all available drive letters. Choose one and click Create Volume. This will launch the VeraCrypt Volume Creation Wizard.
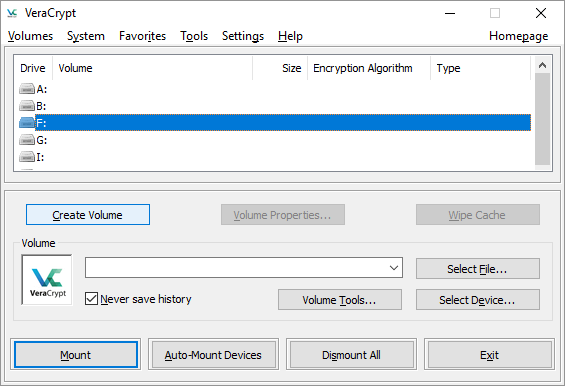
To encrypt your entire USB flash drive, select Encrypt a non-system partition/drive and click Next.
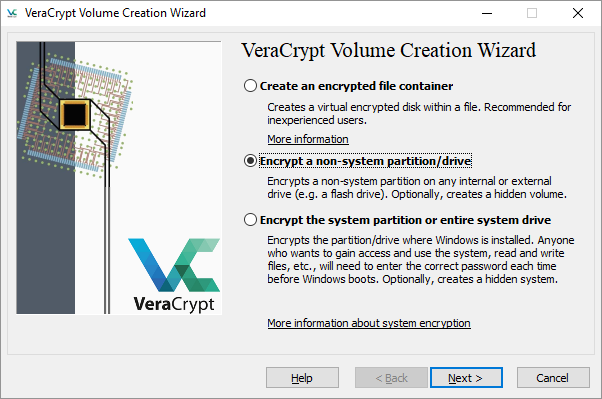
In the next step, you can choose from a Standard or a Hidden VeraCrypt volume. Using a hidden volume reduces the risk that someone forces you to reveal your password. Note that you’ll have to format the entire USB drive if you want to create a Hidden VeraCrypt volume.
We’ll proceed with the Standard VeraCrypt volume. In the next window, click Select Device…, choose your removable disk, confirm with OK, and click Next.
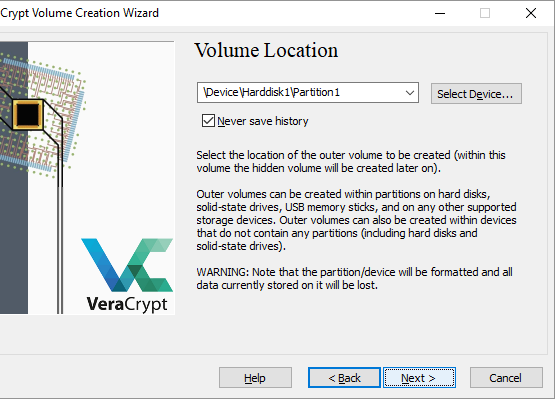
To encrypt the entire USB drive, select Encrypt partition in place and click Next. VeryCrypt will warn you that you should have a backup of the data, in case something goes wrong during encryption. Now select the Encryption and Hash Algorithm; you can go with the default settings. Now you get to set your Volume Password. In the next step, your random mouse movements will determine the cryptographic strength of the encryption.
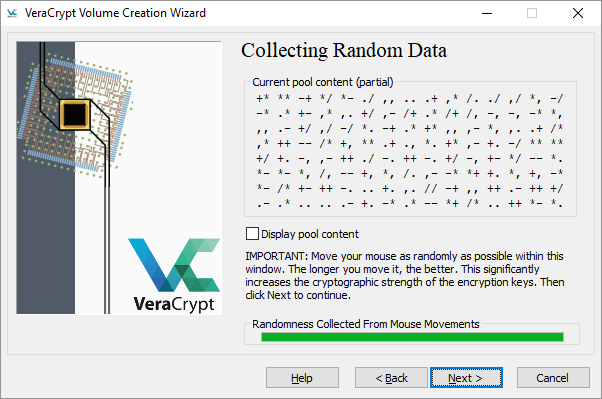
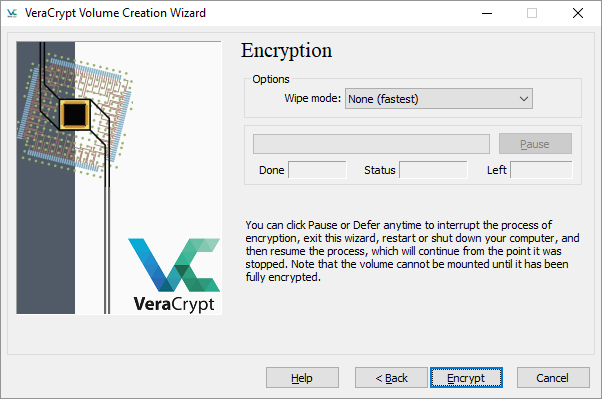
Now choose your Wipe Mode, the more wipes, the safer. In the final window, click Encrypt to start the encryption.
Download: VeraCrypt Portable
Note: An alternative to VeraCrypt Portable is Toucan, a portable app that lets you sync, backup, and secure your files. If you’re using Windows 10 Professional, Business, or Enterprise, you can also use BitLocker to encrypt your drives.
3. SecurStick: Create a Safe Zone on Your USB Drive
This tool is a product of the German computer magazine c’t. It does not require installation and will work with Windows, Linux, and Mac without Admin rights. To set it up, however, you have to run an EXE file from the flash drive you wish to encrypt.
To set up SecurStick, download and unpack the ZIP archive, then copy the EXE file onto your USB stick. Running the EXE file will launch a command prompt and browser window. Enter a password and click Create to install the Safe Zone.
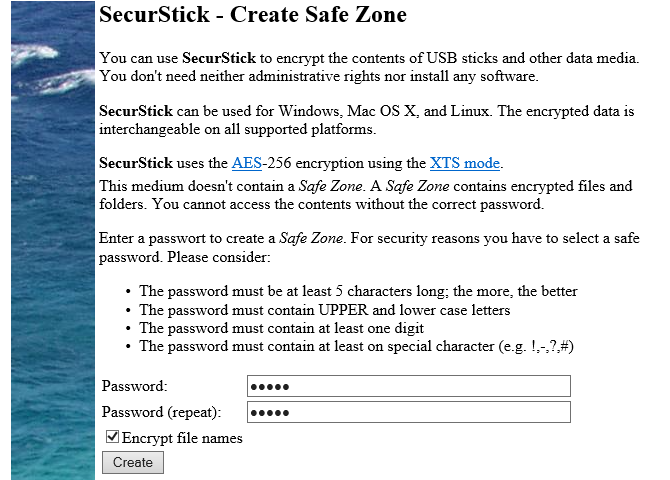
Next time you launch the SecurStick EXE file, you’ll hit a login window. Logging in mounts the Safe Zone. Any files you copy into the SafeZone are automatically encrypted. Note that closing the command prompt window will close your Safe Zone session.
The easiest way to completely remove SecurStick from your flash drive is to format the drive.
Download: SecurStick
Note: Don’t be put off by the German download page! The tool’s interface was fully ported to English, as shown above.
4. How to Encrypt Your Flash Drive on a Mac
If you’re using a Mac, you don’t need a third-party tool to encrypt your USB flash drive.
First, you need to format the flash drive with Apple’s HFS+ file system. Note that this will delete all files stored on it, meaning you should back them up. From the Disk Utility app, pick your flash drive and click Erase. In the popup window, specify the file format, MacOS Extended (Journaled), and click Erase in the bottom right to format the drive.
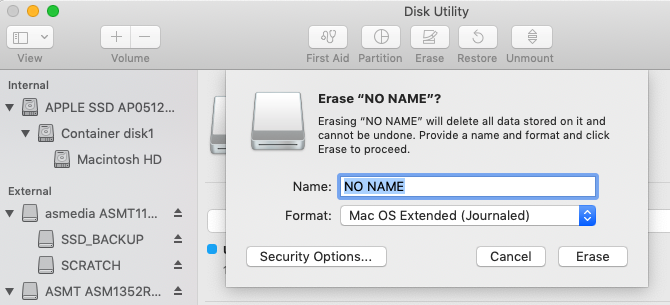
Now you’re ready to create an encrypted flash drive. Simply right-click the drive in Finder, select Encrypt, and add a password. The process starts instantly and can take a few minutes, depending on the size of your USB stick. Shortly, you’ll have an encrypted and password protected USB drive.
5. Cryptsetup: Encrypt Your USB Drive on Linux
Cryptsetup is a free function to set up cryptographic volumes using AES 256-bit encryption. It’s available from the standard Linux repository.
Note: You should not use this tool if you intend on using the encrypted files outside of Linux. Moreover, accessing your encrypted flash drive requires a Cryptsetup installation.
To encrypt your USB stick on Linux, you need to install both the Gnome disk utility and Cryptsetup from sudo apt-get. If you’re using Ubuntu, it should already be installed. Next, launch Disks from the desktop, look for your flash drive, and select to format the drive or a single partition with the encryption option. At this point, you’ll also choose a password. Note that you have to overwrite all existing files.
Reference: Cryptsetup
If you use Ubuntu Linux, please refer to our complete file and folder encryption guide.
How to Save Individual Files With a Password
As mentioned above, you can’t safely password protect your entire USB stick without using encryption. However, if you shy away from the time-consuming encryption process for entire folders and need a really quick way to only protect a few selected files, you can simply save those with a USB password.
Many programs, including Word and Excel, allow you to save files with a password.
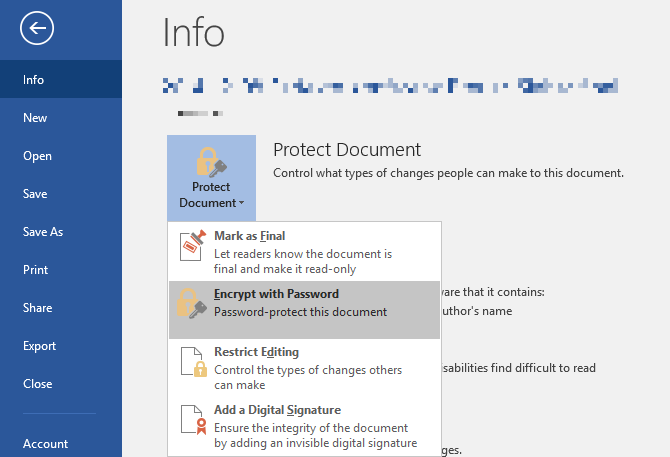
For example, in Word, while the document is open, go to File > Info, expand the Protect Document menu, and select Encrypt with Password.
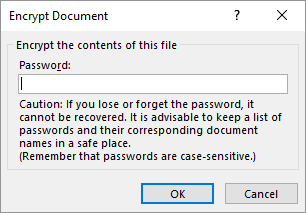
Now enter your password and confirm it to protect your document.
Finally, save your document and don’t forget the password.

To password protect PDF files on your USB flash drive, you can use PDFTK Builder, which also comes as a portable app.
How to Create a Password-Protected File Archive
Archive tools like 7-Zip can also encrypt and password protect your files with AES-256.
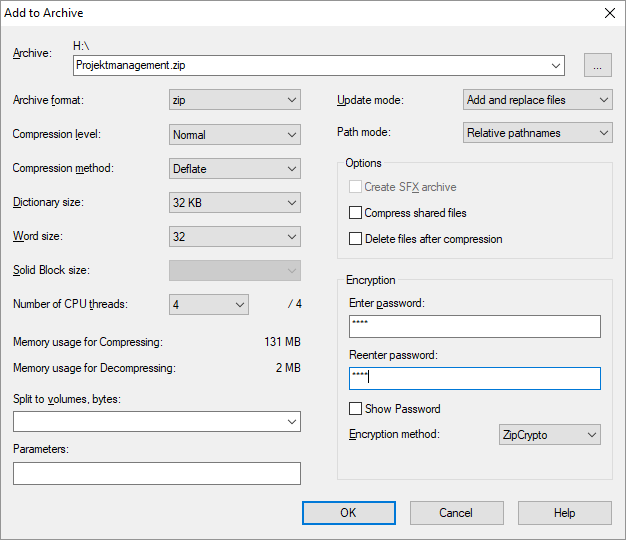
Install and run 7-Zip, right-click the file or folder on your USB drive, and select 7-Zip > Add to Archive. In the Add to Archive window, choose the Archive format and add a password. Click OK to start the archiving and encryption process.
Download: 7-Zip
Your Personal Files, Protected and Encrypted
Now you know how to password protect and encrypt your USB drive on Windows, Mac, and Linux. You can also protect Windows folders. And have you encrypted your smartphone data yet? If you have a few spare USB sticks, you could do something useful with them!
Read the full article: How to Password Protect and Encrypt a Flash Drive: 5 Easy Methods


