GarageBand is a fantastic free digital audio workstation for Apple users. However, it only recognises one input device, which is fine if you’re using an audio interface but can be a problem if you want to record with multiple USB microphones.
Here’s how you can create one device that lets you use more than one USB microphone when recording.
The Benefits of Recording With More Than One USB Mic
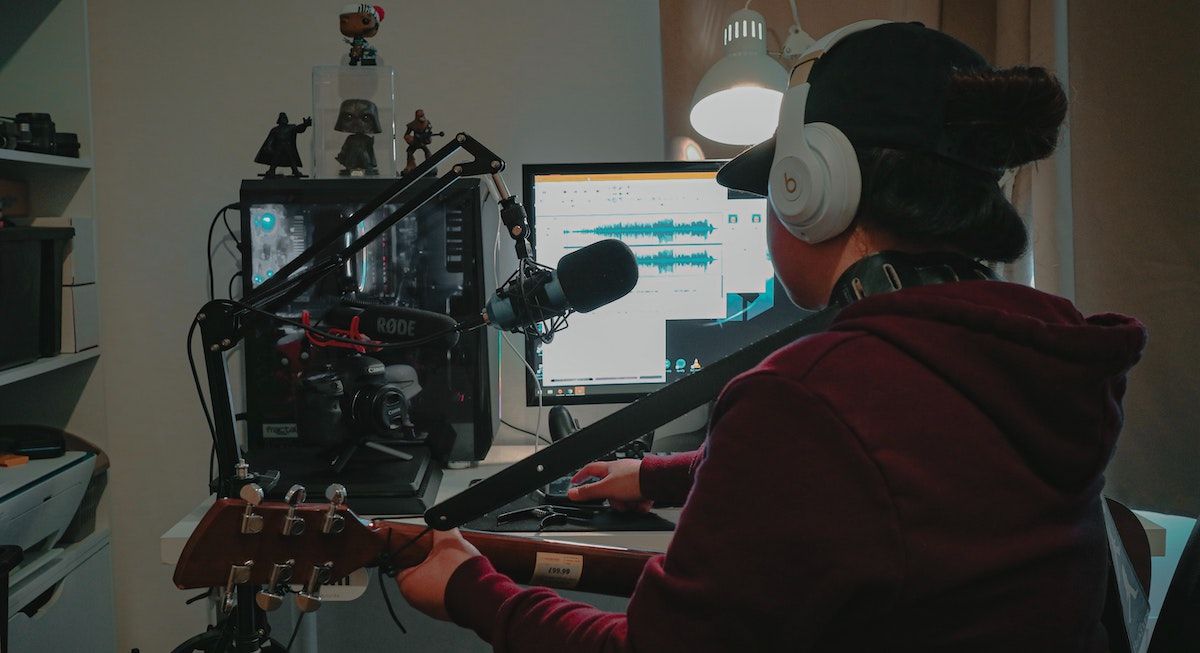
USB mics can be excellent devices – they’re portable, easy to use, and extremely convenient. What’s great is that you can connect them directly into your Mac without an audio interface.
But why would you want to use more than one USB mic in your recording process?
To Capture Quality Recordings When Recording More Than One Live Instrument
If you’re recording a single audio source for something, such as a solo-podcast or a solo-instrument, a single USB mic should be fine, although there are benefits to recording one audio source with more than one mic.
However, when it comes to things like live music where you’re recording more than one instrument, you’ll produce a much higher quality recording with more than one USB mic as you can position each one in the best place to capture each instrument.
To Easily Record New Ideas When Travelling
A huge benefit to USB mics is how portable they are. Due to this, it makes sense to carry more than one USB mic with you if you’re touring or simply travelling from place to place, exploring the world with a guitar accompanying you.
Mics such as the Samson Go Mic are perfect for travelling, taking up minimal space. Because they’re so small and compact, the extra weight will negligible, yet there’ll be a great benefit to recording with two mics instead of one.
To Improve Your Multi-Track Mixing Skills
The process of setting up, recording and mixing with more than one USB mic is a form of multi-track recording that will improve your ability to create better audio. You’ll be aware of more tweaks you can make or what EQ setting fits better with what instrument in what song.
These are skills that improve and develop over time the more you do them, so it’s worth getting familiar with using more than USB mic when recording.
Setting Up Two USB Mics on GarageBand
The key to getting GarageBand to register two (or more, for that matter) USB mics is to set them up in a way that GarageBand can recognise them both. Here’s how you do that and get both your USB mics ready to record on GarageBand.
Step One: Create an Aggregate Device
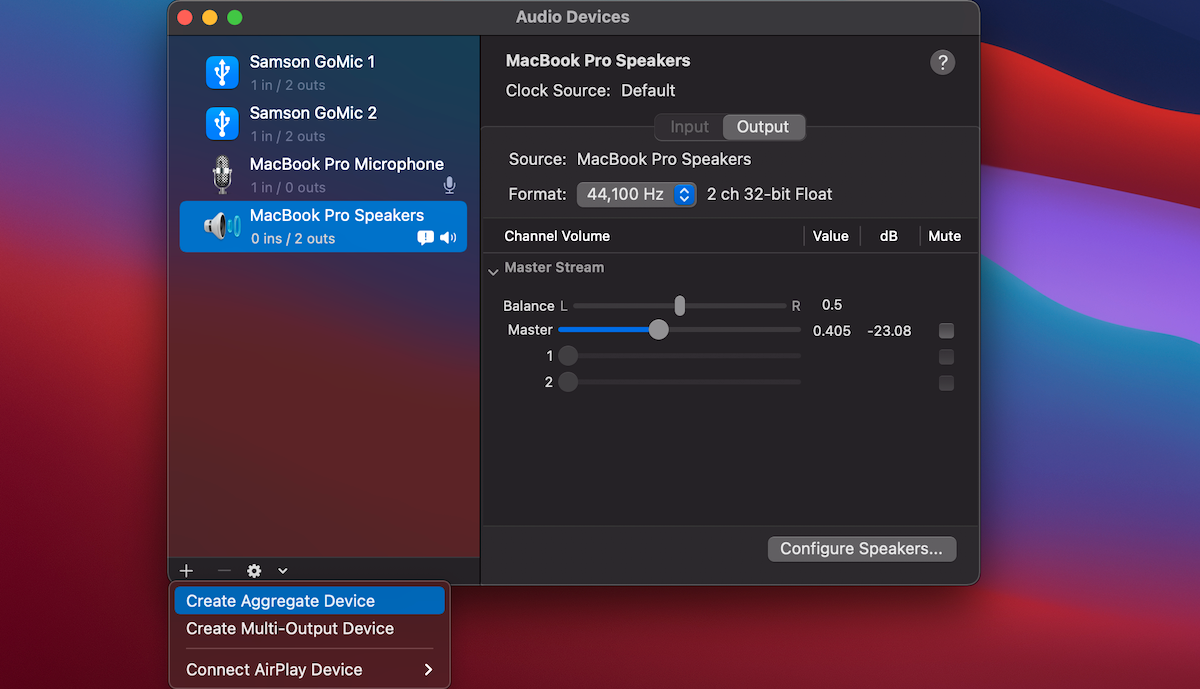
The first thing you’re going to do to combine both your USB mics into an Aggregate Device. This allows you to create an audio device that lets GarageBand recognise more than one audio input.
To do this, you need to open you Mac’s Audio Midi Setup utility. You can access this via a few different options. The quickest way is to search for the app via Spotlight using Cmd + Space.
From here, select the + in the bottom left of the app and select Create Aggregate Device. This should create a new audio device titled “Aggregate Device” which you can rename by selecting it and single-clicking on the title.
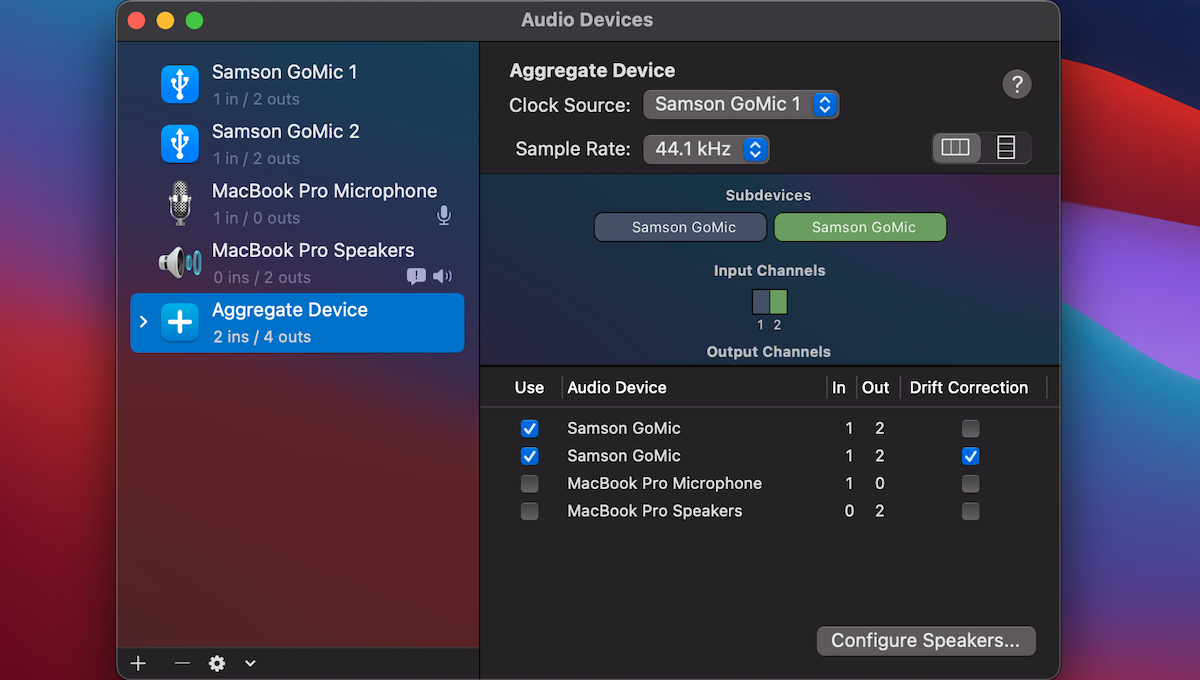
In this audio device, in the Use column, check the boxes for your USB mics. Where it says Input Channels, you can see which of your mics is input 1 and input 2. Make a note of this as this will come up later.
Once selected, you can also change the Clock Source and Sample Rate of your new device if you like. Make sure that for whichever device isn’t the clock source, you have Drift Correction checked.
Your Mac’s Audio Midi Setup is a great utility and can solve other sound issues you may be having. In addition to this, there are some great easy fixes for audio problems on your Mac if your sound isn’t working right.
Step Two: Selecting Your Aggregate Device on GarageBand
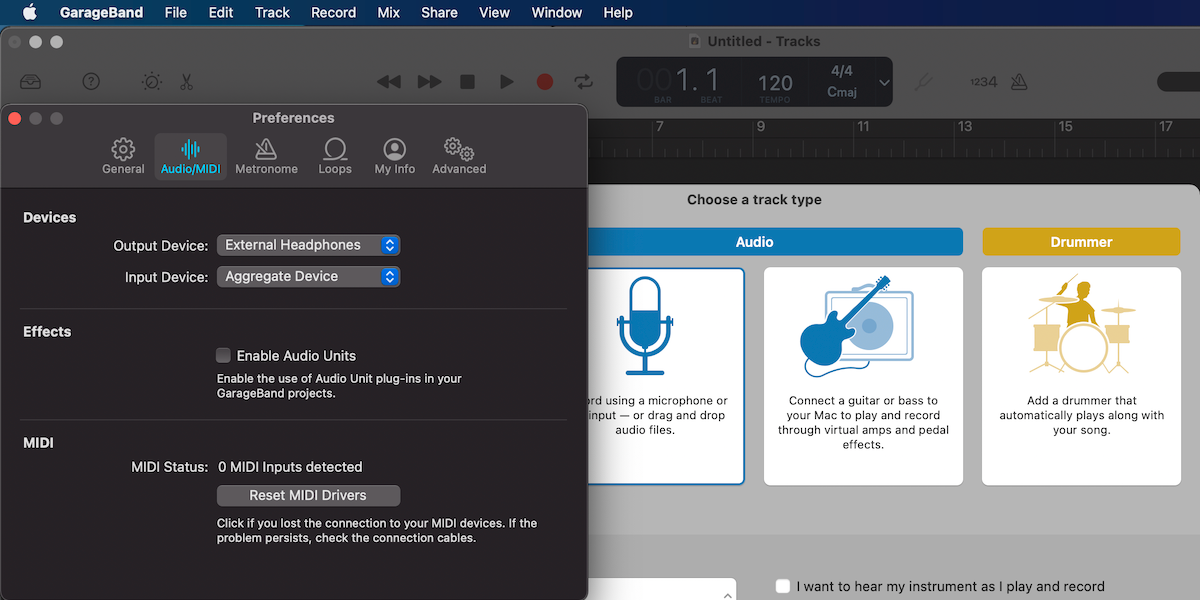
Now that you’ve combined both of your USB mics into an Aggregate Device, plug in a pair of external headphones, open up GarageBand and select Empty Project.
From there, go to the top-left of your screen and under GarageBand, select Preferences, then Audio or Audio/MIDI.
In the Input Device pop up menu, select your Aggregate Device. In the Output Device pop up menu, select your external headphones. Close Preferences.
Step Three: Recording With Both Your USB Mics
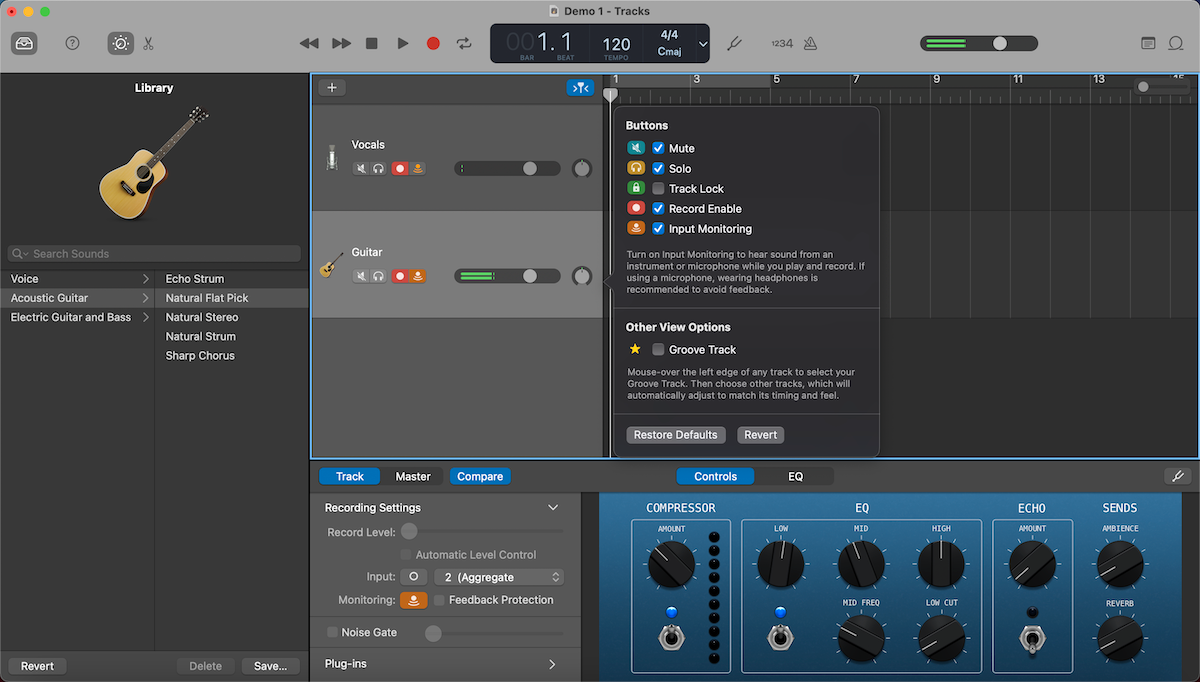
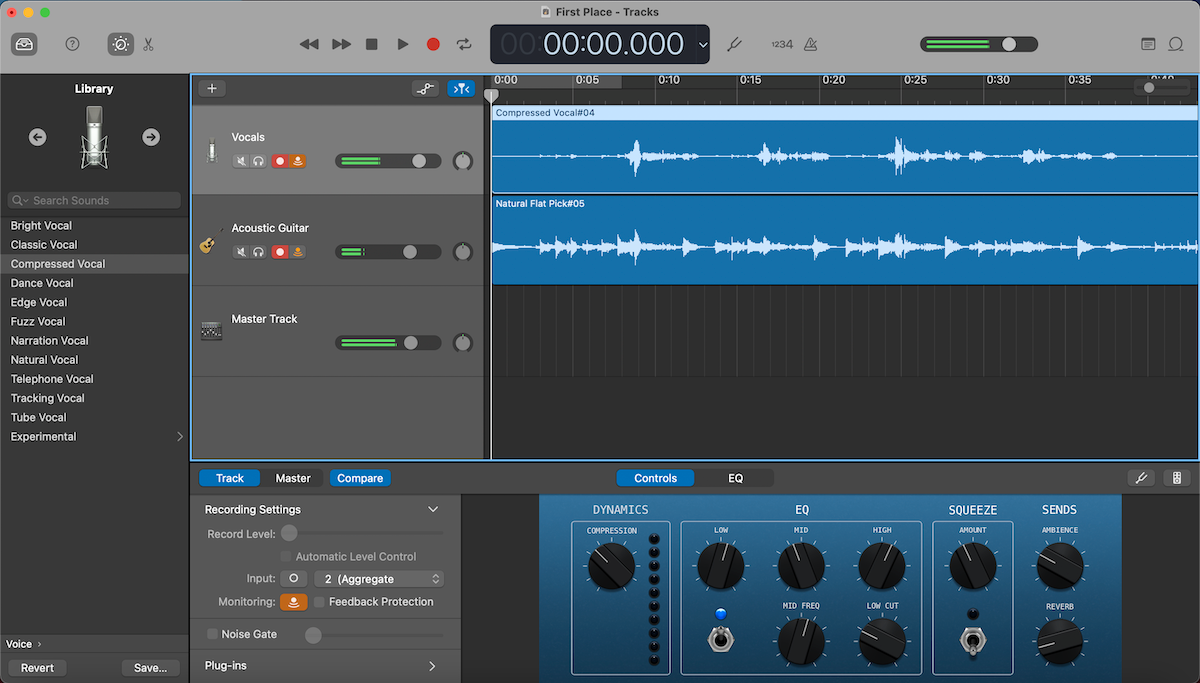
Now that you’ve set up your Aggregate Device as your audio input, it’s time to activate both your mics for recording. There are a few things to take in here, so feel free to refer to the above image as a reference.
From Choose a track type, select the track with the microphone icon.
Once you’ve added this track, use the shortcut Cmd + Option + N to select another audio track, same as before (you can also go through Track, then New Track at the bar at the top of your screen).
Next, select a track and at the bottom, where it says Track and Master, make sure that Track is selected. You should be able to see a drop-down box next to where it says Input and from there, you can select from either of your USB mics.
Here, this will say either 1 (Aggregate Device) or 2 (Aggregate Device) which corresponds to what input channel each of your USB mics was earlier. You can always check this by going back to your Audio MIDI Setup.
You can rename the generic Audio 1 and Audio 2 names of your tracks by selecting the track and double-clicking the title.
And finally, to activate recording on both of the tracks, select a track, right-click it or use the shortcut Option + T and check Record Enable. Do this for both tracks. Now you can record with both your USB mics at the same time!
To listen to your mics as you record, under Input where you selected your mic, activate the icon next to Monitoring.
Oh, and before you start to record, don’t forget to save with Cmd + S.
Now Get Started Recording
As we’ve seen recording two USB mics at once on Garageband is simple, it just requires a little bit of setup. The key is in creating an Aggregate Device and you can add more than two USB mics to this if you’ve got more you want to use.
Learning how to do this is a great skill for you to have in your solo projects and also with collaborations, both locally and remote.

