Auto-playing videos are everywhere on the modern web. They take up bandwidth, make a lot of noise, and slow down your Chrome browser, all without you ever choosing to watch them. Here’s how to stop them for good.
In the most recent update, Google Chrome 66 included the ability to block these autoplaying videos, most of which are based on HTML5. Chrome would remember which sites you stopped an autoplaying video on, and subsequently block those sites from serving such videos to you. But Chrome developers removed this because it conflicted with browser-based games.
While it’s likely that Google will reintroduce this in future Chrome updates, for now, you need a workaround. Deep in the settings of the Chrome browser, you can find options to switch off autoplaying videos.
How to Stop Autoplay Videos on Chrome

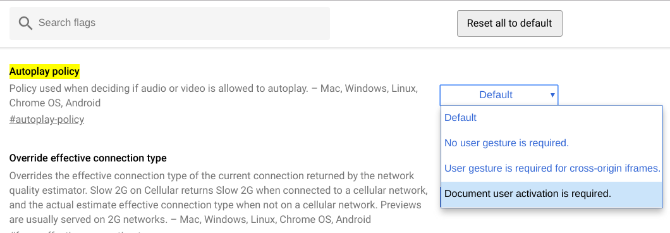
If you are using Chrome on Windows, macOS, Linux, or Chrome OS, you will need to access this setting through the hidden tweaks of Chrome flags. These are deep settings in Chrome, unavailable unless you know where to look.
Here’s how to disable HTML5 autoplaying videos in Chrome:
- Save any unsaved information from an open tab that you want because we will have to restart Chrome in this series of steps.
- Open a new tab in Chrome.
- Type or copy-paste the text in bold, and press Enter: chrome://flags/#autoplay-policy
- Next to “Autoplay Policy”, the button will be set to Default. Click that button and choose Document user activation is required.
- A pop-up bar at the bottom will say “Your changes will take effect the next time you restart your device” along with a button saying Relaunch Now. Click the Relaunch Now button.
- Chrome will restart, and videos will no longer autoplay!
This method will also no longer show pop-up videos at a corner of the screen, like the ones you see on CNET.com.
For any video actually embedded in the page you are visiting, click the play button and it will begin as normal.
Use an Extension to Stop Autoplaying Videos
Generally, I don’t recommend telling people to install an extension in Chrome if it’s something that can be done through Chrome’s settings. After all, extensions slow down your browser.
But in case you feel more comfortable with an extension than fiddling around with Chrome flags, try Disable HTML5 Autoplay.
Download: Disable HTML5 Autoplay for Chrome (Free)
The developer is quite clear about saying that he is no longer working on this extension since Google is now trying to tackle the problem itself. While Chrome 66 had to roll back that feature, this is on Google’s to-do list.
Still, the extension works well for now, so if you would rather not change Chrome’s settings, use it. When a stable version of Chrome can disable autoplaying videos by default, uninstall the extension.
How to Stop Autoplay Videos on Chrome Mobile

On Chrome for Android, things work a little differently. You don’t need to dive into the Chrome flags to change this option, it will work through the regular Settings.
- Tap the three-dot Menu icon.
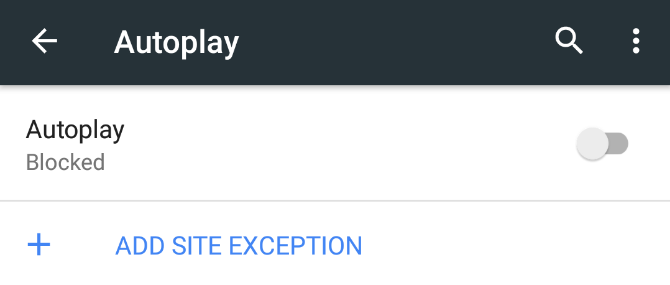
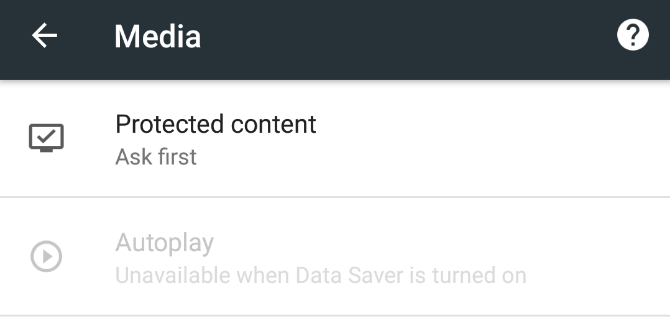
- Go to Settings > Site Settings > Media > Autoplay.
- It will be set to “Allow sites to automatically play muted videos (recommended)” with a blue toggle. Tap the toggle to turn it grey, and the text under it should read “Blocked”.
As with the desktop version, you can now click any video to play it.
This method does not work Chrome for iOS though. In fact, there doesn’t seem to be any method to stop autoplaying videos while using Chrome on an iPhone or iPad. If you’re an Android user, go further with these Chrome power user tips for Android.
Use Chrome Data Saver to Stop Autoplaying Videos

If either of these methods seems a bit difficult for you, there’s another option. Google’s Chrome Data Saver function automatically stops such autoplaying videos.
On Desktop: Data Saver isn’t built into Chrome desktop, so you will have to install it as an extension, and then enable it.
- Download: Data Saver for Chrome (Free)
- Click the extension’s icon in your Chrome’s toolbar, and ensure it has a blue tick, which means it is enabled.
On Android: The Data Saver is already built in for Chrome on Android, so you don’t need to install a separate extension.
To enable Chrome Data Saver, go to the three-dot Menu > Settings > Data Saver and toggle it On.
How to Disable Flash in Chrome

Adobe Flash has a lot of problems, and thankfully, it is slowly being phased out of the internet and replaced with HTML5. But some sites still use Flash, and you need to block them.
In a helpful move, Chrome now does not let any website serve you Flash-based elements by default. It will always ask for permission first.
But you can also go nuclear. Here’s how to disable Flash in Chrome:
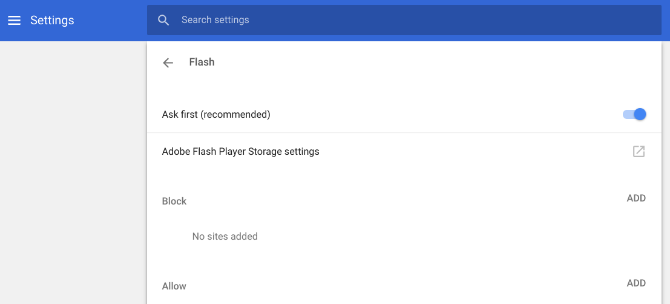
- Go to Settings > Advanced > Privacy and Security > Content Settings.
- Click the entry for Flash.
- Click the blue toggle to change from Ask First (recommended) to Blocked.
With that, you will have completely blocked Flash from running on Chrome. This is an extreme option, and will also disable things like the best free browser games. I would actually recommend keeping it at Ask First, and allowing Flash only on select sites.
Adobe is killing Flash in 2020, so you aren’t missing out on much if you don’t use it. But you still need it for certain sites on the desktop, like streaming high-definition sports.
Note: This method is only needed for the desktop version of Chrome. Both iOS and Android don’t support Flash, so there is no need to disable Flash in Chrome mobile.
Finally, Automatically Mute New Tabs
One of the annoying problems with autoplaying videos is the sound. If you don’t mind the video but just want the sound to not startle you, use this other method to automatically mute new tabs in Chrome or Firefox.
Read the full article: How to Stop Auto-Playing Flash and HTML5 Videos in Chrome

