You can’t install a VPN natively on your Apple TV, but there are workarounds you can use to enjoy the same functionality. Apple neglected to put VPN functionality in tvOS, the modified version of iOS designed for the big screen.
This is probably down to the fact that many use VPN connections to circumvent the region locks imposed by so many of the content providers that conduct business on the platform. Services like Netflix, free to air catch-up services, and live TV streaming apps abound.
VPNs and DNS Tunnels on Apple TV
There are two methods of using a VPN to access region-locked content, and a third less-reliable method that uses DNS tunneling. Neither is guaranteed to work with every service you try, so your mileage may vary. But if you’re already paying for a VPN, you’ve got nothing to lose by trying.
Here we’ll look at the following methods:
- Using a router to connect your network directly to a VPN, then accessing services using your Apple TV as normal.
- Configuring a virtual router to connect your Apple TV to a computer that’s already configured with VPN access.
- Using DNS tunneling to make your Apple TV appear as if it’s in the same country your content is locked to.
Method 1: Using a VPN Router
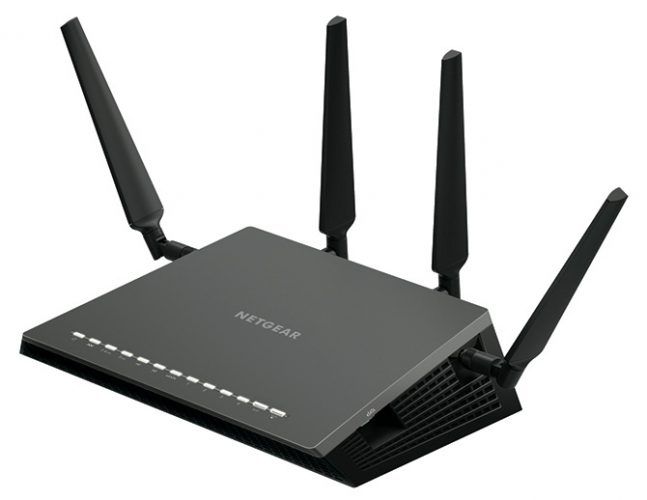
In order to connect your router to a VPN, you’ll need a router or router firmware that supports this ability. If your router was supplied by your Internet Service Provider (ISP), there’s a good chance it won’t include this feature. ISPs tend to provide cheap hardware that does the bare minimum required of the service.
Some routers may lack this feature, but by installing custom firmware this feature can be added. This is a bit risky since you’re removing the manufacturer’s default firmware and replacing it with third party code, so be prepared just in case something goes wrong.
One of the best examples of third party router hardware is DD-WRT. This open source Linux-powered router firmware replacement is compatible with a wide range of network hardware. Check whether your router is compatible on the DD-WRT supported hardware list.
OpenWrt is another open source firmware replacement, also based on Linux, with a modular package-based approach. It allows you to pick the packages you want, rather than providing features you don’t necessarily need.
If you’re using ExpressVPN, you can use ExpressVPN firmware on your router to make connecting to various VPN connections even easier. If you’ve taken the plunge and upgraded to a modern mesh router system, you likely already have VPN client compatibility (and can administer it using your smartphone).
To find out if your router is compatible, check the manual, or login to your router’s control panel and hunt for the “VPN client” feature.
Connecting Your Router to Your VPN
There’s no single method for connecting your router to your chosen VPN. First you need to head to your router’s control panel, the address of which is usually listed on the side of the device. Common addresses include 192.168.0.1 and 10.0.0.1.
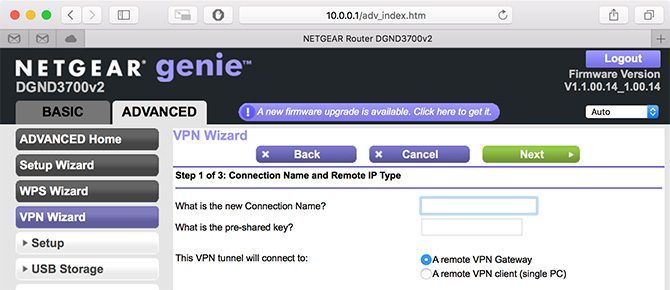
Add a new connection for your chosen server. You’ll need to get this information from your VPN provider, and add a new connection for each server you wish to use. Make sure you use a good description so you know where each server is located.
Activate that connection to route all of your network traffic to that server. Every device on your network—including your Apple TV—will now be routed through your chosen VPN connection. You can disable this connection (or switch to another server) whenever you need to using your router’s control panel.
A Good Solution, But Not Perfect
The biggest problem with this solution is that it’s an all-or-nothing approach. Other members of your household can’t watch local content on catch-up TV while you’re trying to stream the contents of another country’s Netflix catalog.
This also slows down your entire network, so playing multiplayer games on your PlayStation 4 while watching international catch-up TV services will result in a dreary gaming experience. You will have to log in to your router and fiddle with the settings each time you want to disable or change your VPN settings.
On the plus side, from a security standpoint the entirety of your network is protected. Add a local server for regular use and you won’t notice a huge drop in speed, nor will you need to set up VPN access on every device in your household.
Method 2: Using a Virtual VPN Router
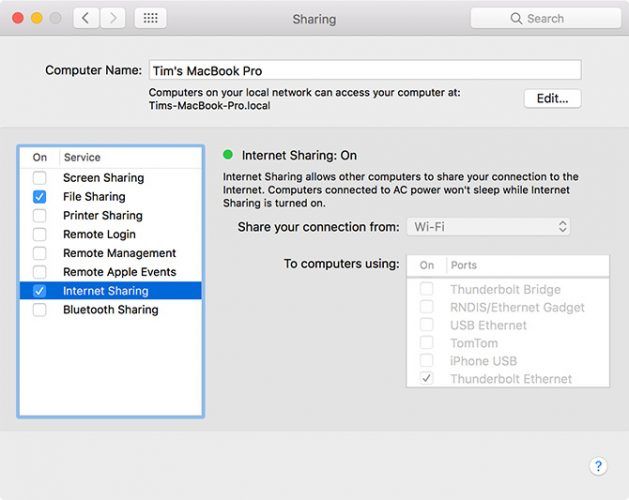
This method is very similar to the last, except instead of using a router connected to a VPN, you’re routing your Apple TV (and any other connected devices) through another device that’s already connected to a VPN.
This means you can route only the devices you want through your VPN of choice, without affecting the whole network. Other members of your household can still stream local live TV services in another room, while you’re watching international content through your Apple TV.
Sharing Your Computer’s VPN Connection
This is pretty easy to do, whether you’re using a Mac or Windows computer. You can also achieve results using Linux (check our our guide to using a VPN on Linux), but sharing your connection will require a little more tinkering and work depending on which distro you are using.
Both macOS and Windows 10 include support for connecting to a VPN with no additional software necessary. Some providers provide their own software to make this easy, but you don’t really need it. Check out how to install a VPN on Windows 10.
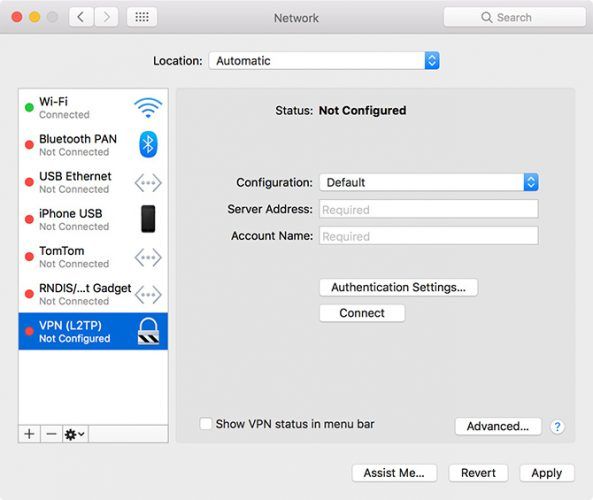
On a Mac you can head to System Preferences > Network and click on the plus button to add a new connection, then choose VPN. From here use your provider’s credentials to create the connection and click Connect. You can also grab one of these free third party Mac VPN clients if you want to use another protocol (like OpenVPN).
The final step is to share your internet connection. You can have one active network type and one shared network type at any time. That means if you connect your computer to your router via Ethernet, you can create a shared Wi-Fi connection. You can’t share the Wi-Fi connection you’re already using as another wireless hotspot, unless you have a spare USB Wi-Fi adapter.
The best method is to connect your computer directly to your router and create a Wi-Fi hotspot, since you can connect multiple devices to one shared Ethernet connection. Check our our guide to creating a Wi-Fi hotspot with Windows, or our tutorial for sharing your Mac’s internet connection.
A Customizable Approach to Sharing a VPN
This method allows you to restrict your VPN to your Apple TV and any other streaming devices, rather than re-routing all of your network traffic. It’s more of a temporary solution, especially if your network equipment is in an awkward location (for which you’ll need a laptop).
It’s easy enough to set up though, and switching your VPN on or off, or changing the server you’re connected to is pretty straightforward. You can even install your VPN provider’s own software to make this part easy.
For MacBook users in particular this solution will require an investment in a Thunderbolt to Ethernet adapter, since Apple hasn’t included an Ethernet port on MacBooks for some time now.
Method 3: DNS Tunneling
The final method doesn’t involve a VPN at all. Many VPN services provide DNS tunneling services as part of their VPN packages, whereas others sell this service separately. Some services sell DNS tunneling separately, many services refer to it by a different name like ExpressVPN’s MediaStreamer.
Some services like ExpressVPN will require the use of free dynamic DNS (DDNS) providers in order to keep your IP address up to date. Others, like UnoTelly, simply require you to login to your control panel to update your address manually.
Once you’ve signed up for an account that supports DNS tunneling and configured DNS where required, head to Settings > Network on your Apple TV and choose either Wi-Fi or Ethernet to configure that particular network. Scroll down to DNS and input the relevant IP address as per your provider’s instructions.
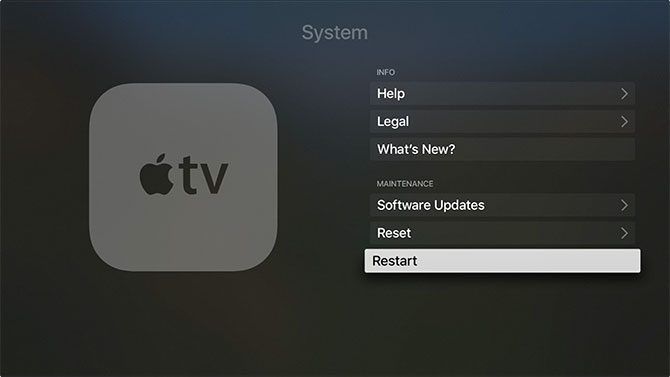
From here simply restart your Apple TV under Settings > System > Restart and region-locked content should (hopefully) now be available to you. Your provider should handle most of the relevant back-end stuff, though it’s often possible to fine-tune your location to unlock specific local services.
Easy to Use, But Easily Defeated
DNS tunneling used to be the best method of accessing region locked content. Unlike VPN connections, you can access content at the maximum speed your internet connection will allow. There’s also no need to connect to different networks for different content, since the provider handles this on a service-by-service basis.
But heavy hitters like Netflix and BBC iPlayer started cracking down on DNS tunneling a few years ago, and introduced better protections against it. Many applications now perform custom DNS lookups to circumvent even OS-level DNS tweaks.
The Best Method for Using a VPN on Apple TV
The use of a VPN means better security, and more reliable access to region locked content. The cost is speed, since your overall speed will be limited by the speed of the VPN connection. By comparison, DNS services are lightning fast but often fall short since content providers can now easily circumvent them.
For many users, the second method (using a virtual router) provides the most flexibility. You won’t lose internet speed across your whole network, and the VPN connection is likely to work a lot better for region-locked content than a DNS server would.
If security is your number one priority, the first method is also ideal. Not having to set up a VPN on every device makes it easy to secure everything in one quick step. Provided the server is relatively close to you, your internet speed hopefully won’t take too much of a hit.
Still looking for a VPN? You may be interested in the best VPNs according to Reddit, but we personally recommend ExpressVPN. Use this link to save 49% on ExpressVPN today!
Read the full article: How to Use a VPN With Your Apple TV
